
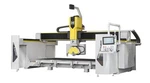
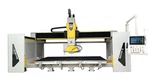

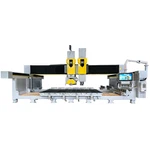
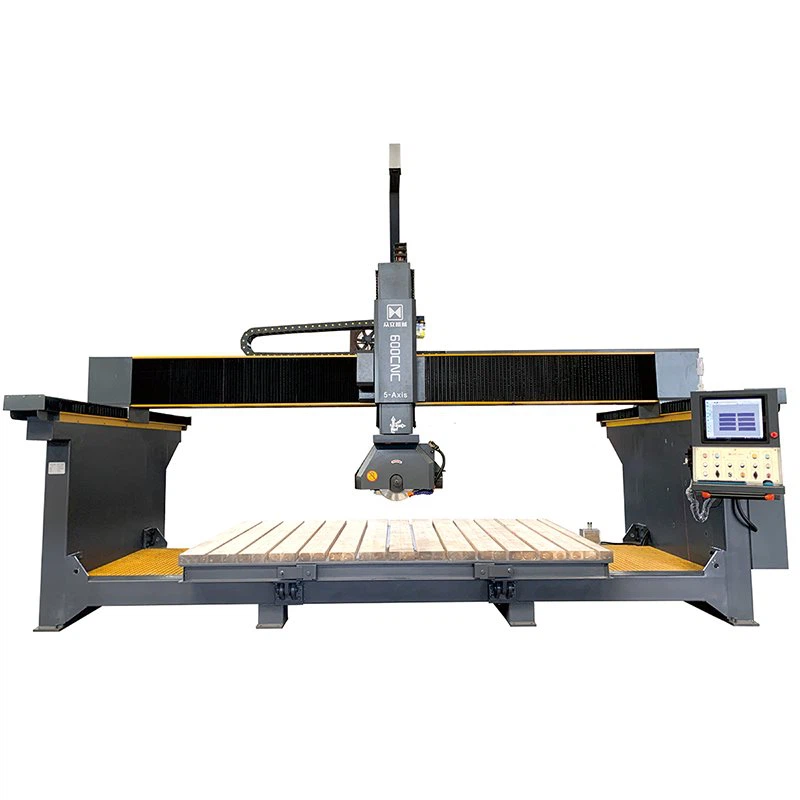


CNC Granite Cutting Machine
Linhai Zhongli Machinery Manufacturing Co., Ltd. is one of the most reliable manufacturers and suppliers of cnc granite cutting machine in China. Welcome to wholesale durable cnc granite cutting machine in stock here and get quotation from our factory. Quality products and reasonable price are available.

Products Parameters
|
Model |
ZLBS-600CNC/5A |
ZLBS-600CNC/5A (special design) |
Unit |
|
Worktable size |
L3500*W2000 |
L3500*W2000 |
mm |
|
Maximum Processing |
L3500*W2000*H500 |
L3500*W2000*H800 |
mm |
|
Blade diameter |
₵350-600 |
₵350-600 |
mm |
|
Control center |
Industry computer with CNC System(Weihong Brand) |
Industry computer with CNC System(Weihong Brand) |
|
|
Driving motor |
Servo motor |
Servo motor |
|
|
Main motor power |
22 (permanet magnet motor with frequency) |
22 (permanet magnet motor with frequency) |
kw |
|
Total power |
30 |
33 |
kw |
|
Head rotate |
0°-360° |
0°-360° |
|
|
Head tilt |
0°-90° |
0°-90° |
|
|
worktable flip |
85° |
no |
|
|
Water consumption |
2 |
2 |
m³/h |
|
Total weight |
6 |
6 |
t |
|
Dimensions |
L5750*W3260*H4100mm |
L5750*W3260*H4100mm |
mm |
|
Delivered dimensions |
L5750xW2200xH2500mm |
L5750xW2200xH2500mm |
|
|
Delivered method |
The main part delivered as whole in a high-cube container |
The main part delivered as whole in a high-cube container |
|
Quotation
CNC Granite Cutting Machine For Sale Price(USD):
|
Option: (System)
1. Self-developed CNC System with "Cut Cam"software for 2D/2.5D Production
2. ESA System from Italy for 3D Production |
Option: Chassis be hot-dip galvanized |
Option: Add front sliding doors |
Option: Worktable be faced with plastic plate and rubber |
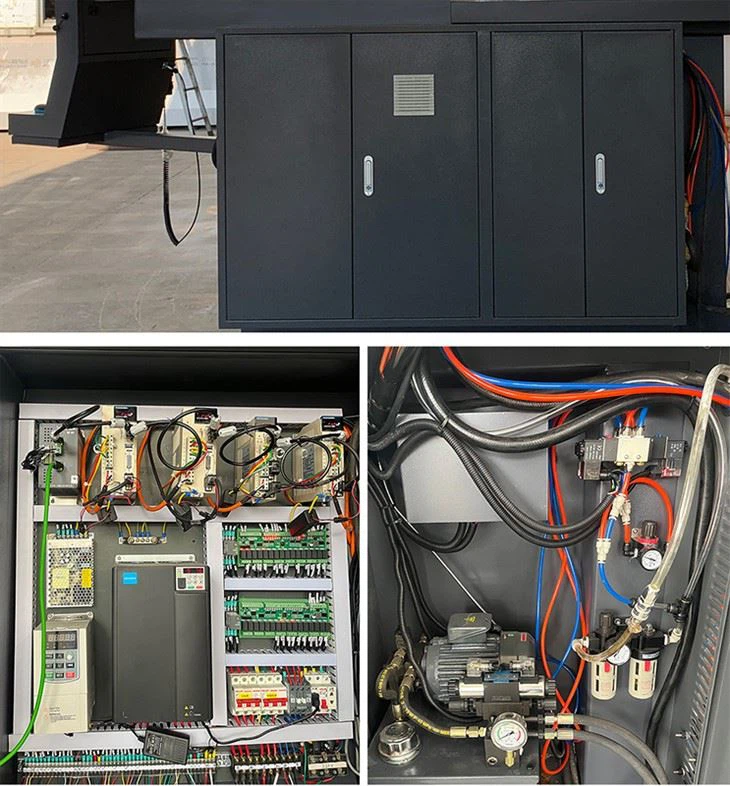
Product Features

01
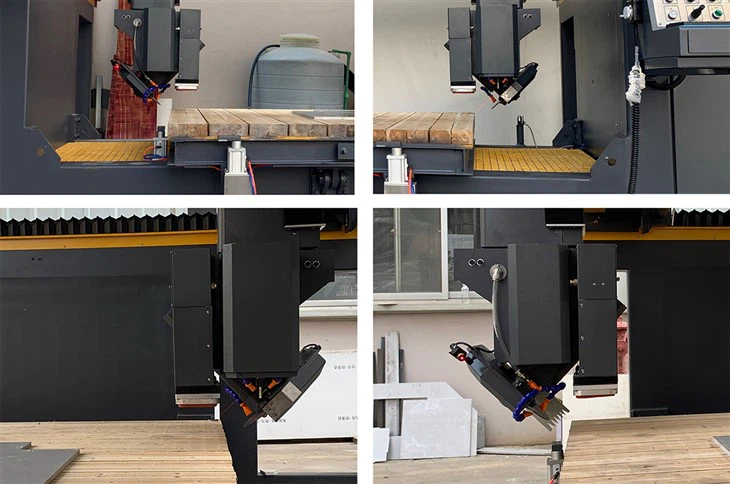
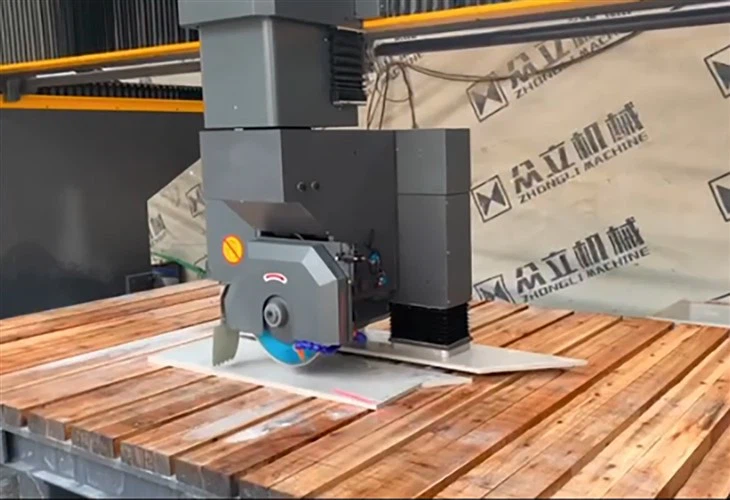
5-Axis Heavy-Duty CNC Machine
The machine is a 5-Axis heavy-duty CNC Bridge Saw Machine
It has conjoined structure, takes up less space, and is easy to install and move.

02
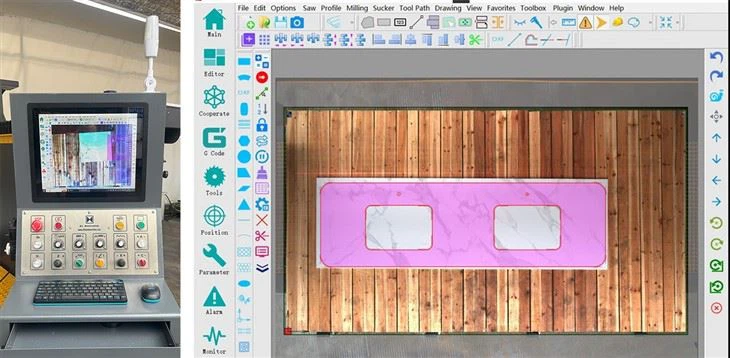
With A Camera to Locate the Position
This Machine equipt a high-precision camera to locate the position of the plate and display it during the cutting procedure.
It's a fully Automatic Machine, after taking a picture and applying the design sketch to the system, the machinery will start working automatically.

03
Worktable Turnover 85°
This worktable can be flipped over 85° for easy loading slabs.

04
Head tilt 0°-90°, Head rotate 0°-360°
The A axis can automatically rotate 0-90°, while the C axis can rotate up to 360°.

05
Four-Side Chamfering
This machine has excellent four-side chamfering function, with excellent chamfering range 3500x2000mm.
Even big size slabs can be processed with this model.

06
With 17" Color Touch-Screen
This Machine has an industrial computer and a 17" color touch-screen.

07
With CNC System and a Built-in Library
The system has a built-in library of conventional-shaped drawings. It supports DXF format imports from designer or countertop measuring gauges.
Operators can process various forms of chamfering and 3D shaping, such as arc line shaping and chamfering and wave line shaping and chamfering, with the function of photo layout.

08
With Automatic Tool Setting Gauge
An automatic tool setting gauge is equipped that automatically checks the blade.
It ensures high-precision Production.

09
With Suction Cups
If the blade-cutting path conflicts, the suction cup will help to move slabs automatically.
It enables complete automatic Production.

10
With a 22-KW Permanent Magnet Motor
This Machine has a 22kw Permanent Magnet Motor
It can automatically adjust the output power, strength, and is power-saving and environmental friendly.
Application Videos
Application Pictures


Shipment


Factory Show


Honours
ZL Machine was founded in 1993, and specializes in stone machine manufacture.
After more than 30 years' Development, we have become one of the most competitive enterprises in China. We have many Patents and have won the honors of "China Top Ten Enterprises (Stone Machinery)", "China AAA Grade Enterprise for Credit&Service (Stone Machinery)", "China Competitive Enterprises (Stone Machinery)", etc. And we have gained the quality certification of ISO9001, ISO2000, China Occupational Health and Safety, CE, etc.


Industry Information Sharing
key points to Granite exterior walls Construction
The construction preparation work before the installation of granite slabs mainly includes laying out large construction drawings, material selection and pre-assembly, base treatment, elastic lines, etc.
1. Post construction drawings
According to the construction drawings and the measured wall and column facing size and shape and the joint width between the facing panels specified in the design, draw a large block diagram and a detailed node diagram, and determine the size, quantity, installation sequence number and processing of the panels. requirements, etc., as the basis for processing ordering and installation.
2. Material selection and pre-assembly
The material selection work mainly involves checking and rechecking the geometric dimensions of the required boards against the construction drawings, and classifying them according to the size of the errors, checking for defects on the polished surfaces of the boards, and classifying them according to texture and color.
Defective boards should be resized or installed in inconspicuous locations. Materials must be selected piece by piece. Those with broken, discolored, local defects or missing edges and corners will be piled separately. Cracked boards can be bonded with epoxy resin adhesive.
After the material selection and repair work is completed, pre-assembly can be carried out. In order to achieve the purpose of tightly matching and similar joints, the boards must be pre-assembled according to the design drawings, and the pre-assembled boards should be numbered. The numbers should be from top to bottom according to the construction procedures. According to the layout below, for the plates at the sun corners, the corners must be ground and cornered according to the design drawings.
3. Substrate treatment
Before installing granite slabs, careful treatment of walls, columns and other substrates is the key to preventing hollowing and falling off of decorative panels after installation. The base body should have sufficient stability and rigidity, and the surface of the base body should be flat and smooth. For brick walls, protruding mortar joints should be cleaned to make them into concave joints, and holes in the wall should be repaired.
For concrete walls and columns, they must be roughened or painted with concrete interface agent to enhance the bonding strength of the mortar. The remaining mortar, dust and oil stains on the surface of the substrate should be brushed off with a wire brush and rinsed with water. Check whether the specifications, quantity and layout of embedded metal parts are consistent with the construction drawings. If any errors are found, they should be dealt with promptly.
4. Elastic line
Play the control lines and block lines, pop up the 500mm horizontal control line on the indoor wall, and pop up the facade center line on the pillars; play the ±0.000 and horizontal elevation control lines on each floor outdoors, and play the block lines according to the diagram. Before large-scale construction, a sample must be made according to the design. After passing the inspection, the actual sample must be disclosed to the operator.
ˆ
Wet construction technology
1. Binding the steel mesh: firmly bind the vertical bars (Φ8) or horizontal bars (Φ6-Φ8) to the Φ6-Φ8 U-shaped embedded parts embedded in the base. The vertical steel bar spacing can be set according to the width of the decorative panel. The horizontal steel bar spacing is 20~30mm lower than the vertical dimension of the decorative panel. If the base body does not have pre-embedded steel bars, M16 expansion bolts can be used to fix it.
2. Drilling: It is usually processed by the manufacturer when ordering the section.
3. Install decorative panels: The substrate must be moistened with water before installing the decorative panels. When installing decorative panels, you should first determine the installation position of the first brick in the lower part. The method is to use a wire drop to hang the wire from top to bottom. According to the width of the grouting joint and the size of the steel mesh, determine the distance between the surface of the board and the base layer and throw it to the ground. Draw the outline size of the first layer of board along the wall corner or column edge. line, then pop the lower edge of the first layer of board onto the wall. If there is a skirting board, the elevation line of the skirting board should be played first. Seat according to the pre-arranged numbered veneer panels.
The installation sequence is generally from bottom to top, with each layer starting from the middle or one end. The cylinder can be installed clockwise, generally starting from the front. After the first layer of boards is installed, use a ruler to find the verticality, use a horizontal dimension to find the leveling, and use a square ruler to find the yin and yang angles. If problems are found, the wooden wedges can be adjusted and padded with lead sheets to make the gaps between the counterwoods uniform and the upper opening straight.
In order to prevent the boards from wandering and dislocating during grouting, affecting the verticality and horizontality, temporary fixing measures must be taken, such as at least two column facing sections made of square wood or small angle steel on each facing panel of the column. Clamp the slightly larger post hoop securely and then tighten it with wooden wedges.
4. Grouting: After checking that all the qualities of the board meet the requirements, use 1:2.5 cement mortar to grout the column in layers, with a mortar consistency of 8~15cm. The thickness of each layer is generally 150~200mm, and should be less than 1/3 of the height of the decorative panel. Use a small steel drill to gently insert and pound. Do not insert or pound vigorously to avoid expansion of the board. Once the expansion of the decorative panel is found, the verticality should be adjusted in time. After the first layer of grouting has initially set, grout the second layer until the grouting is stopped 50 to 100mm away from the top of the decorative panel, and the remainder is used as the grouting joint between the upper and lower layers.
5. Cleaning: Before the mortar in the first layer of decorative panel solidifies, clean the remaining slurry at the top. After the mortar solidifies, remove the wooden wedges, clean the debris in the gaps, and then install the second layer of panels.
6. Caulking: After all decorative panels are installed, clean the surface, then use the selected caulking material for caulking, and wipe clean the edges. When caulking, make sure the caulking is dense and consistent in color.
7. Waxing: Thoroughly clean the surface to make it clean, and then wax to protect the finished product.
8. Acceptance: Acceptance shall be carried out according to relevant standards.
Quality requirements
1. The plates must be strictly accepted and checked, and the specifications and dimensions should meet the design requirements. The use of cracked and incomplete boards is prohibited. The minimum thickness of the plate shall not be less than 20mm.
2. The anchors must contact the wall and be firmly fixed with bolts. Ordinary iron parts and their welding must be rust-proofed.
3. The straightness of the lattice joints meets the design requirements, the board joints are even, and the sealant must be filled and firmly filled without leakage.
4. Pay attention to the protection of the finished product. After the columns and door and window covers are installed, the external corners should be protected with wooden boards in time. When removing the shelf, be careful not to hit the wall.
Prevention of common quality problems
The alkali return and frost on the granite slab is a common quality problem of exterior wall granite slabs, especially when the exterior wall does not have rain-shielding facilities such as overhangs and corridors. It is rare to see the phenomenon of returning to alkali and spitting out frost indoors. It is obvious that the alkali return frost on the granite plate veneer is due to the alkali solution dissolved in water overflowing from the gaps between the plates in the atmosphere when there is leakage, and seeping out from the fine pores of the plate. When the solution comes into contact with carbon dioxide in the atmosphere, it reacts to form water-insoluble carbonic acid, salt, and sulfate. The solution is hard and has strong adhesion, making it difficult to clean.
To solve the above problems, we should start from the following points:
1. Before pasting, the back side of the board must be treated with impermeability. First, clean the floating debris and dust on the back side of the board and wipe it clean with a damp cloth. Then apply 107 glue along the mud twice. After brushing, dry and maintain in the shade for no less than 7 days. Days, the brushing slurry must be even and no leakage is allowed. The consistency of the brushing slurry should not bite the brush broom, but should not be too thin.
2. The top of the wall should be pressed with a board, and a 45° angle or edge should be made at the intersection with the facade board. The joint between the corner boards should be 1.5~2mm, and the middle of the joint should be 5mm. The mortar within the depth must be cleaned, and finally Fill with sealant before sealing.
3. When dealing with board joints, the mortar within 5mm of the joint surface should be cleaned at any time, and the same color sealant should be filled tightly before final sealing. This will not affect the overall appearance. Through the above measures, many explorations and implementations have been carried out in the granite plate exterior wall veneer projects, and the common problem of alkali return and frost spitting has been basically eliminated.
Hot Tags: CNC granite cutting machine, China CNC granite cutting machine manufacturers, suppliers, factory, Granite Stone Cutting Machine, Granite Chamfering Machine, Granite Cutting Machine, CNC Granite Cutting Machine
Previous
Building Stone Cutting MachineNext
No InformationYou Might Also Like


Send Inquiry